|
|
(Pro) Using Key Frames
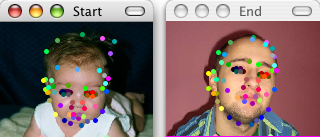
For this example, we are starting with a different morph, as pictured here. This sample layout also comes included with Morpheus Photo Morpher Mac in its final
form for you to play around with.
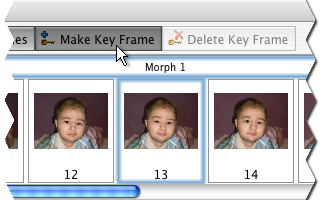
The quickest way to add a key frame is to make sure Preview All Frames is enabled in the Timeline window. Simply click on any of the frame thumbnail
buttons to select it, then press the Make Key Frame button. A key frame will be made at that point in the morph.
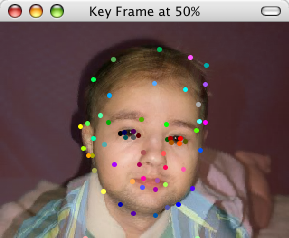
Just doubleclick on the key frame button in the Timeline window and a new window will appear, allowing you to adjust the dots for that key frame.
Now the morph will transition from the starting picture to this key frame before completing the transition to the ending picture.
|
| Copyright © 1999 - 2026 Morpheus Development, LLC. All Rights Reserved Privacy - Purchase Terms |
 Key frames are an optional step you can use to further improve the look of your morph. This is a more advanced feature which requires
Morpheus Photo Morpher Mac Professional, as well as having beginner mode menus unchecked.
Key frames are an optional step you can use to further improve the look of your morph. This is a more advanced feature which requires
Morpheus Photo Morpher Mac Professional, as well as having beginner mode menus unchecked.
 Key frames define midpoints in your morph to allow the dots to move in a defined path as they transition from the starting picture to the
ending picture. Normally, the dots would move in a straight line directly from their position on the starting picture to their final position.
Key frames define midpoints in your morph to allow the dots to move in a defined path as they transition from the starting picture to the
ending picture. Normally, the dots would move in a straight line directly from their position on the starting picture to their final position.
 Key frames are defined at certain percentage points in the morph and are not tied to specific frames in the timeline. This example key frame
was created at the 50% point in the morph.
Key frames are defined at certain percentage points in the morph and are not tied to specific frames in the timeline. This example key frame
was created at the 50% point in the morph.
 The key frame windows work just like the picture windows. The dots have multiple partner dots instead of just one partner dot now. The number of
partner dots each dot has will be one more than the number of key frames in that morph.
The key frame windows work just like the picture windows. The dots have multiple partner dots instead of just one partner dot now. The number of
partner dots each dot has will be one more than the number of key frames in that morph.
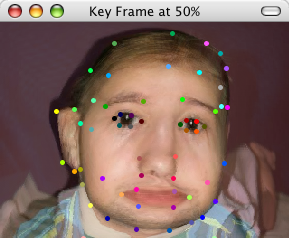 When you move the dots in the key frame window, the picture will be updated to show you what the morph will look like at that percentage point.