Adding Dots
 Once you finish the Layout Wizard you will be brought into Morpheus Photo Animation Suite Mac with a new layout containing your picture similar to
what is shown here.
At first glance, it looks like the same picture is loaded twice into two different windows, but in reality the picture you selected is only loaded
into the picture window labeled Start. The picture window labeled End is an editable preview of the final frame of your warp which will change
as you proceed with the rest of the steps.
Once you finish the Layout Wizard you will be brought into Morpheus Photo Animation Suite Mac with a new layout containing your picture similar to
what is shown here.
At first glance, it looks like the same picture is loaded twice into two different windows, but in reality the picture you selected is only loaded
into the picture window labeled Start. The picture window labeled End is an editable preview of the final frame of your warp which will change
as you proceed with the rest of the steps.
 The next step in creating your warp is to place dots in both of the picture windows in order to define how
the warp will animate. First, you must select the Add Dots tool from the toolbar with the list
of various tools on it as shown here.
The next step in creating your warp is to place dots in both of the picture windows in order to define how
the warp will animate. First, you must select the Add Dots tool from the toolbar with the list
of various tools on it as shown here.
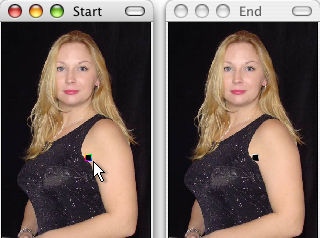 In this example, we'll start by placing a dot near the
edge of the arm in the starting picture window, because we plan on creating a warp which changes the size of her arm.
Simply click on the picture to add a new dot.
In this example, we'll start by placing a dot near the
edge of the arm in the starting picture window, because we plan on creating a warp which changes the size of her arm.
Simply click on the picture to add a new dot.
Notice that a corresponding "partner" dot will appear automatically in the opposite picture window, for every dot that you add to a picture.
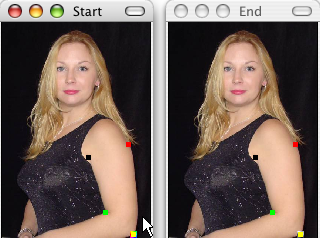 Here we have added
three more dots around the arm.
The more dots you place on any elements of your pictures, the better your resulting warp will be.
Here we have added
three more dots around the arm.
The more dots you place on any elements of your pictures, the better your resulting warp will be.
The most recently added dot will glow with a colorful outline, and its partner dot will glow with a black and white outline. This lets you
easily see where the dots have been added. Notice how the partner dots appear in the same location on the ending picture as they do in the starting
picture window. These partner dots will need to be adjusted by you (on the next step of this tutorial) so that they
change the look of the ending picture to represent how you want the last frame of your warp animation to look.