Rendering the Photo Mix
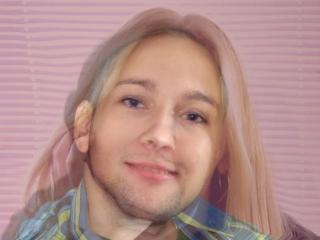
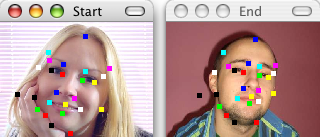 Here we have added a total of 25 dots to the photo mix and are ready to render
it to a file for use outside of Morpheus Photo Animation Suite Mac. The layout in this final form is available to play around with since it is included as one of the
sample layouts with Morpheus Photo Animation Suite Mac.
Here we have added a total of 25 dots to the photo mix and are ready to render
it to a file for use outside of Morpheus Photo Animation Suite Mac. The layout in this final form is available to play around with since it is included as one of the
sample layouts with Morpheus Photo Animation Suite Mac.
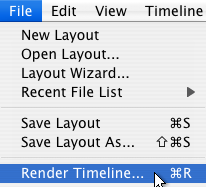 In order to render your photo mix, simply
select Render Timeline from the File menu, as shown here. The option just above Render Timeline is Save Layout.
Keep in mind that rendering is not the same as saving your layout. Saving your layout saves your work
(which pictures you are using and where you have placed dots) so that you can change your morph later on. Rendering
creates a file which can be emailed or displayed in other programs, but which cannot be changed by Morpheus Photo Animation Suite Mac in the future.
In order to render your photo mix, simply
select Render Timeline from the File menu, as shown here. The option just above Render Timeline is Save Layout.
Keep in mind that rendering is not the same as saving your layout. Saving your layout saves your work
(which pictures you are using and where you have placed dots) so that you can change your morph later on. Rendering
creates a file which can be emailed or displayed in other programs, but which cannot be changed by Morpheus Photo Animation Suite Mac in the future.
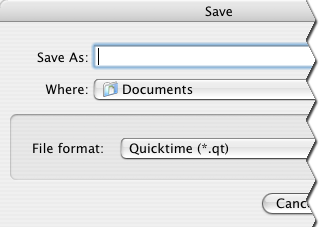 At the Save window, you can select a location to render your photo mix to, enter a name for the file, and select a file type to render to.
Enter any file name you wish, but make sure you remember which folder on your hard drive you saved your photo mix into.
At the Save window, you can select a location to render your photo mix to, enter a name for the file, and select a file type to render to.
Enter any file name you wish, but make sure you remember which folder on your hard drive you saved your photo mix into.
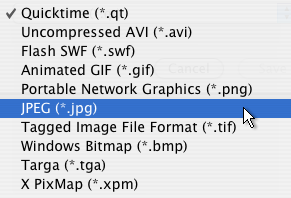 JPEG and PNG formats are the best for displaying on webpages.
Here we will render to a JPEG picture by selecting JPEG
from the "File format" dropdown.
JPEG and PNG formats are the best for displaying on webpages.
Here we will render to a JPEG picture by selecting JPEG
from the "File format" dropdown.
 After a brief rendering progress window, your photo mix file will be created and ready for viewing.